1990Volvo740GLNonTurbo
Member
- Joined
- Aug 14, 2024
How does one bleed the air from the transmission lines, or will the air accumulate in the pan area overnight and out of the system?

Hello Guest, welcome to the initial stages of our new platform!
You can find some additional information about where we are in the process of migrating the board and setting up our new software here
Thank you for being a part of our community!
It will come out as the pump runs. Don't even need to let it sit if there's enough fluid in there.will the air accumulate in the pan area overnight and out of the system?
Does the ambient temperature affect the level of the fluid. let's say it's 102 and the car has been sitting all night. Do I start the car, wait four minutes, use the hot side of the dipstick or start the car, wait four minutes, and use the cold side?It will come out as the pump runs. Don't even need to let it sit if there's enough fluid in there.
Wait for the thermostat on the dash to reach normal full operating temp to use the warm side of the dipstick. The temperature of the transmission fluid will approach that of the radiator coolant temperature, so for a fully warmed (hot) engine that's closer to 180-200 degF (depending on thermostat) as opposed to a 102 degF ambient temperature. Remember to pause it through all the gears before measuring it with the engine still running to get an accurate reading. If the dipstick is difficult to read, try rotating it 180 degrees. The transmission cooler fills from the bottom up, so any air will quickly find its way to the top of the system for a proper measurement.Does the ambient temperature affect the level of the fluid. let's say it's 102 and the car has been sitting all night. Do I start the car use the hot side of the dipstick or start the car, wait four minutes, and use the cold side?
I was reading elsewhere that the rectangular notch on the dipstick has a purpose, what is it?Wait for the thermostat on the dash to reach normal full operating temp to use the warm side of the dipstick. The temperature of the transmission fluid will approach that of the radiator coolant temperature, so for a fully warmed (hot) engine that's closer to 180-200 degF (depending on thermostat) as opposed to a 102 degF ambient temperature. Remember to pause it through all the gears before measuring it with the engine still running to get an accurate reading. If the dipstick is difficult to read, try rotating it 180 degrees. The transmission cooler fills from the bottom up, so any air will quickly find its way to the top of the system for a proper measurement.
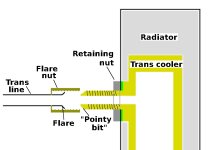
If you ever overfill it, disconnect the transmission fluid return line from the top of the rad and have an assistant start the engine for a brief moment while you hold a container under the fitting held at an angle. A short length of vinyl tubing slipped over the threads can be useful for doing it without an assistant. A whole lot easier, less messy and more accurate than removing the pan plug to drain a little off then trying to thread it back in while fluid is running down your hand. The brass fitting in the plastic side tank is fairly solid, but be sure to use a counterhold wrench when trying to crack open the fitting. Precede that with a few goes of penetrating oil if needed. Squeezing slightly offset handles between two hands is usually what's needed to crack it while minimizing the stress on the plastic. A flare wrench is recommended to avoid damaging the brass collar, but as long as an open end wrench fits snugly and is held perpendicular then you should be okay.
I always thought the notch near the plastic tip was just a flex point, but now you've made me look it up. It's apparently a transmission fluid level indicator for a stone cold engine that hasn't been running and the fluid has had a chance to drip down for a few hours. When re-filling a trans that's the approximate fluid level you should aim for before starting and running. You're supposed to wipe the dipstick clean and re-insert it before reading the level. I'd never read that before in all my years of owning and maintaining bricks. It's not in the Volvo AW Service Manual. The reference I found was in the 700/900 FAQ. You learn something every day!I was reading elsewhere that the rectangular notch on the dipstick has a purpose, what is it?

I believe that information is in my TSB manual for 240. Pre delivery checks section if I recall correctly.I always thought the notch near the plastic tip was just a flex point, but now you've made me look it up. It's apparently a transmission fluid level indicator for a stone cold engine that hasn't been running and the fluid has had a chance to drip down for a few hours. When re-filling a trans that's the approximate fluid level you should aim for before starting and running. You're supposed to wipe the dipstick clean and re-insert it before reading the level. I'd never read that before in all my years of owning and maintaining bricks. It's not in the Volvo AW Service Manual. The reference I found was in the 700/900 FAQ. You learn something every day!
So the filling can be done cold and not started in the morning using the notch as a reference.I always thought the notch near the plastic tip was just a flex point, but now you've made me look it up. It's apparently a transmission fluid level indicator for a stone cold engine that hasn't been running and the fluid has had a chance to drip down for a few hours. When re-filling a trans that's the approximate fluid level you should aim for before starting and running. You're supposed to wipe the dipstick clean and re-insert it before reading the level. I'd never read that before in all my years of owning and maintaining bricks. It's not in the Volvo AW Service Manual. The reference I found was in the 700/900 FAQ. You learn something every day!
This is helpful information especially since it comes from a 700 series source.I always thought the notch near the plastic tip was just a flex point, but now you've made me look it up. It's apparently a transmission fluid level indicator for a stone cold engine that hasn't been running and the fluid has had a chance to drip down for a few hours. When re-filling a trans that's the approximate fluid level you should aim for before starting and running. You're supposed to wipe the dipstick clean and re-insert it before reading the level. I'd never read that before in all my years of owning and maintaining bricks. It's not in the Volvo AW Service Manual. The reference I found was in the 700/900 FAQ. You learn something every day!
Good question. You do need to be careful with the dipstick length in 240s as two different lengths were used. Some of the early 240 dipstick tubes and dipsticks can be 4-1/2" longer than the later 240 and the 700/900 ones. The changeover year in the 240s appears to be 1988.What is the proper length for the dipstick. My 240 came without one and I salvaged one from a 740 without thinking it makes a difference
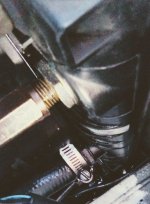
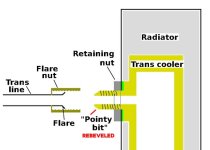
I don't believe the trans fluid line brass fittings on the rad are replaceable. From what I recall they're a press fit, not a threaded fit. They're attached to a small metal plate on the inside of the tank. It might vary by manufacturer exactly how they're made. If they're a threaded fit then you may be able to remove and replace it with one from a similar rad. If it's just the threads damaged then you may be able to carefully cut the damaged end off, but it may be tricky to round the end to properly seal with the flared tube. It's not under much pressure, so anything oil proof would work to seal it. Teflon tape could be used, but it may be tricky to get a good seal. You don't want any bits of tape or goop going down into the trans. .How about the male fitting that extends from the Coolant radiator top, the fluid exit? Where can I get a replacement, it looks like it unbolts from the radiator. mine it stripping.
Or, how about me hack sawing 1/2 inch of the tip.? About 3/4 " was never used, or reached for fastening. Would that work?

Mine doesn't but if max has just as much space, he might be able to do what he suggested. hack sawing off.25 inch for more grip.It looks like it's cross threaded.
Does it leak?

hack sawing off.25 inch for more grip.
Does the nipple screw off?