• Hello Guest, welcome to the initial stages of our new platform!
    You can find some additional information about where we are in the process of migrating the board and setting up our new software here

    Thank you for being a part of our community!

Tranmission Pan Bolts

Joined
Aug 14, 2024
What is the socket size for the transmission pan bolts and what are the torque specifications.?
1990 Volvo 740 Gl Automatic Non Turbo
 
Last edited:
The AW70/AW71/AW72 trans pan bolts use a 10mm socket. The 700/900/960 Volvo specification manual says the torque is 3-3.5 ft-lbs. The Volvo 700/900 Pocket Data Book says 4-5 ft-lbs. Note that these torques specs are for a clean, dry thread and mating surface. These are fairly light torques and may be a bit difficult to achieve accurately. I tend to lean to the high side of those specs and will even go a couple of ft-lbs higher if I'm dealing with a leaking gasket. Main thing is you don't want to warp the pan flange.

The 700/900 trans pans can be a bit fussy to torque and have them remain drip free depending on the gasket material, whether it's a new gasket, whether you use a gasket compound, either with or without a gasket, and especially if someone previously unevenly torqued or overtorqued the pan and damaged it. Carefully check the pan upside down on a flat surface to make sure the pan flange is perfectly level. Best to torque from the middle bolts out to the corners and be prepared to repeat the pattern until the gasket material is fully compressed and the torques remain stable. Be careful when repeating torques with a click wrench as there's a tendency to go a little tighter with each click.

I have to confess to recent mistakes. When looking for an AW trans pan gasket for one of my 940s, I found a Corteo cork gasket on clearance at Rock Auto for a ridiculously cheap price. Corteco (of Italy) is generally regarded as an OEM quality supplier and I've often used Corteco shaft seals before, so thought I'd try it. That was my first mistake. The second was deciding to use a wipe of gasket sealer on one side of the cork. The two combined were simply way too thick compared to the thin Volvo gasket. Took a number of passes to compress the cork and squeeze the gasket compound to achieve a uniform spec torque around the pan. Took a further two attempts at re-torquing the pan over the next two months until it finally compressed and stopped weeping. Everything's been fine since then. You live and learn!
 
Last edited:
The AW70/AW71/AW72 trans pan bolts use a 10mm socket. The 700/900/960 Volvo specification manual says the torque is 3-3.5 ft-lbs. The Volvo 700/900 Pocket Data Book says 4-5 ft-lbs. Note that these torques specs are for a clean, dry thread and mating surface. These are fairly light torques and may be a bit difficult to achieve accurately. I tend to lean to the high side of those specs and will even go a couple of ft-lbs higher if I'm dealing with a leaking gasket. Main thing is you don't want to warp the pan flange.

The 700/900 trans pans can be a bit fussy to torque and have them remain drip free depending on the gasket material, whether it's a new gasket and whether you use a gasket compound, either with or without a gasket. Best to torque from the middle bolts out to the corners and be prepared to repeat the pattern until the gasket material is fully compressed and the torques remain stable. Be careful when repeating torques with a click wrench as there's a tendency to go a little tighter with each click.

I have to confess to recent mistakes. When looking for an AW trans pan gasket for one of my 940s, I found a Corteo cork gasket on clearance at Rock Auto for a ridiculously cheap price. Corteo (of Italy) is generally regarded as an OEM quality supplier and I've often used Corteo shaft seals before, so thought I'd try it. That was my first mistake. The second was deciding to use a wipe of gasket sealer on one side of the cork. The two combined were simply way too thick compared to the thin Volvo gasket. Took a number of passes to compress the cork and squeeze the gasket compound to achieve a uniform spec torque around the pan. Took a further two attempts at re-torquing the pan over the next two months until it finally stopped weeping. Everything's been fine since then. You live and learn!
Indeed.

The UK Volvo site suggests (and I agree with) using your 1/4" drive ratchet, 10mm hex socket, and torque them "wrist tight", just like the RB oil pan which also easily deforms when you attempt to reach specified torque.

I always choose to adhere the gasket to the pan in this case.... when you go in for service, your gasket needs to stay attached to the steel pan. You will at least have the chance to reuse the gasket if you bought a quality unit in the first place.

As 945T wisely states, CLEAN DRY threads. If you don't have an inch pound beam type torque wrench, don't even think of setting this with a larger lb.ft. clicker wrench. I believe that is why the UK brothers wisely suggest the light torque of the wrist (minus gorilla strength).
 
Would using a gasket, with a gasket compound, prevent or seal any slight warping of the pan?
The only thing that will prevent warping of the pan is proper torque applied to the bolts. Buy an inch*pound torque wrench. Everyone that does any mechanical work should have one in their tool box. There are as cheap as $20.
 
Indeed.

The UK Volvo site suggests (and I agree with) using your 1/4" drive ratchet, 10mm hex socket, and torque them "wrist tight", just like the RB oil pan which also easily deforms when you attempt to reach specified torque.

What is "Wrist Right"?
TIghtening the bolts by feel?
 
Would using a gasket, with a gasket compound, prevent or seal any slight warping of the pan?
Won't prevent it, but adding a gasket compound can help deal with minor deformations. Better to use a thicker gasket maker rather than a thinner gasket sealer if you expect this to be an issue. Always use an RTV compound that's specifically rated for use with ATF.

Apply a narrow, even bead on the pan, keeping it near the outside of the flange so it won't squeeze out into the trans and possibly break off. Do only the one surface unless the trans surface is damaged in order to make it easier to get off in the future. You can use a mallet and block of wood to try straightening the pan if needed, but if you're not careful could make it worse. If there are any indentations where the bolts go then work them flat.

As a bit of an aside here, one of my 940s came with only blue RTV compound as the trans pan gasket. It had oozed out and become a bit gooey, so obviously not ATF rated. The service records indicated that the PO had it maintained by their local gas station garage who were likely too lazy to order in a proper gasket or have a suitable ATF compatible gasket maker on hand. Why they bothered to take the pan off a four year old car to change the trans fluid rather than just drain and flush it was also questionable. Since at least the late 1980s Volvo no longer required the trans filter to be replaced as part of regular maintenance as long as the fluid was changed regularly. Unlike the earlier 740s (with the same engine, trans and a similar exhaust), it's a huge pain to get the trans pan off a 940 automatic as there's an exhaust bracket attached to the trans that blocks access to 2 or 3 of the rear pan bolts. Obviously the Volvo engineers designed this bracket on paper and didn't consulting their mechanics when they designed this bracket. You have to remove the cross member and entire trans mount to remove the bracket. Those trans mount bolts are really on tight the first time they need to be removed, often requiring an impact wrench or cheater pipe on a breaker bar. Apparently a fair number of 940s now have this bracket deleted, which can put additional strain on the downpipe and exhaust header if additional support isn't added upstream.
 
Last edited:
As an added bonus for those following this trans pan gasket discussion here, getting the dipstick filler tube disconnected from the pan can often be next to impossible, so here's one of my favourite DIY fixes.

Now some people do have luck and manage to eventually get the nut to loosen by using two well fitting and sturdy wrenches, using one wrench slightly offset as a counterhold and squeezing them together with all your mite. Many end up rounding and damaging the nuts and having to quit. If you get carried away or aren't careful you can end up damaging the pan at the fitting and end up needing to replace the pan. The first time I eventually loosened mine, but was starting to round the nut faces. On the next car, to avoid rounding the nuts I decided to use crowsfoot flare wrenches on breaker bars, using one as a counterhold. Cheap crowsfeet can spread open in these kinds of situations, so I made sure to get a quality set. I still couldn't budge it and was starting to risk damaging the pan. No amount of soaking with penetrating oils seemed to help this frozen fitting. A heat gun on high didn't help and I was reluctant to hit it harder with a torch.

Doing some research, what most people end up doing is disconnecting the dipstick filler tube bracket from the starter motor and dropping the trans pan with the tube still attached as an assembly. That in itself isn't always the easiest thing to do, especially when working in cramped quarters. You need a universal joint and extensions to get at the starter motor bolts. The starter bolt can also be fun trying to get off, especially if it's never been off before.

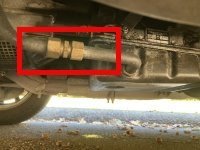
Then the light bulb went on and I remembered seeing a simple and elegant solution to disconnecting the dipstick tube from the trans pan. It's a suggestion you'll find in the old 700-900 FAQ (still on the UK Club website). You simply cut the tube in the straight section where it attaches to the pan (stay at least 1" away from the bend) and use a compression fitting to reconnect it. Some people use a hose and ring clamps, but that's not at all ideal and should be considered a temporary connection. This is metric sized tubing so what you want is a double ended 16 mm O.D. brass compression union. If you can find one then great, but for most of us these aren't going to be locally available and definitely not cheap. The elegant part of this fix is knowing that 16 mm is just a human hair fatter than 5/8" (15.875 mm). Double ended 5/8" brass compression unions can often be found in better plumbing stores, including the likes of Home Depot, for under $10.
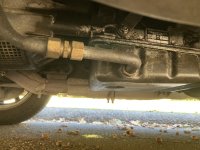
IMG_1541.JPEG
A half-decent stubby tubing cutter will eventually slice through the soft steel tube leaving a nice finished edge, or you can use a saw and file to round the edges, just don't dent or damage the surface where the compression rings will sit. You'll need to cut out about a 1/2" to 5/8" section of tube to accomodate the fitting. The 5/8" collar nuts and compression rings will be snug over the metric sized pipe, but with a little effort can be twisted on. Any little inserts that come with the fitting aren't for use with metal pipe. Note that you need to place the fitting and loosely connect the pipes as you put the pan back in place, not after the pan is back on and all tightened up. You generally don't use Teflon tape with compression fittings, but if you put some on the threads (not the tube) then it will remain easy for the next person to get it off.
 
Last edited:
What size wrench to use for the end of the dipstick filler tube at the pan?
It's a 24 mm wrench for the brass nut with a 30 mm wrench as a counterhold on the brass flange nut. If you know a truck mechanic, they have those sizes of tools. A beefy adjustable (crescent) wrench is okay as the counterhold on the flange. A flare wrench is preferable on the brass nut to get a grip on all six corners of the hex and as well to help keep the wrench straight and not slip and round the brass. If you've ever used a flare wrench to break open a stubborn fuel line you'll appreciate that this will have a better chance of success then using a standard open end wrench. However, flare wrenches normally don't have extra long handles, so you'll want a cheater pipe for the extra leverage as well as a higher quailty wrench so the jaws don't spread and break. Quality flare wrenches of that size are often hard to come by, even online. A plumbing wrench is not advisable on either nut as it will quickly damage the brass. After a token effort to break the fitting open (as I now have a set of large crowfoot flare wrenches), I now always plan on cutting the tube rather than spending another 20 minutes trying to get the nut loose and likely still failing, or even 15 minutes with extensions and u-joint socket getting the bracket off at the starter motor so I can drop the whole assembly. If I didn't have the tools I'd go straight to cutting the tube and installing a compression fitting as the price of a fitting is less than the price of a u-joint or 24 mm wrench and way less than the price of a quality 24 mm flare wrench. Knowing I'll be able to easily get it off next time is another consideration. You never know when you might have to install a new kickdown cable.
 
What is "Wrist Right"?
TIghtening the bolts by feel?
Yes sir. Using the mini ratchet, even choke up on it (if that's possible). When the torque is that low, you can approximate the same torque with a simple "twist of the wrist".

If you want to convince yourself; buy the inch lb. wrench, torque to the minuscule 3.5 spec. Then apply increasing torque with the baby 1/4" drive ratchet until you just budge that torqued bolt. That "felt wrist torque" is the value. I think you would be surprised how easy it is to reach that level of torque with the baby ratchet in your hand.

Similarly, look at the M10 box wrench. Given how short it is, try applying high torque with one. The wrenches were designed of length to provide an appropriate torque for the standard strength fasteners.

On the other hand, I've done this for a LONG time. For the inexperienced.... the torque wrench would be preferred.
 
I'll chime in and say that for every horror story about dropping the pan, sometimes it ain't that bad. Ive done a aw70L and aw71L and the hardest part of each was accidentally ordering the wrong filter kits, spilling atf all over my driveway when I removed the filter, and having to remove the exhaust support bracket on one of them. I've had good luck with the dipstick coming off, and then from there, once the pan is cleaned out and the new filter with gaskets is in, I just align the cork gasket over the pan and zip tie it together through every other bolt hole or so. From there I put in all the bolts I can just enough to hold the pan in place, and start clipping the zip ties and putting in the rest of the bolts. I didnt use sealant or anything and I've been lucky enough to not have leaks. I just go "hand firm" on the bolts. It's hard to describe but when you feel it you'll know. No need to get them crazy tight.
 
Did you mean that the connection area in red is a modification, not OEM?
Yes. A $10 modification that allows you to easily drop the trans pan when the dipstick filler tube won't easily detach. In 940s, the exhaust system bracket that blocks access to the rear pan bolts is off screen to the right. In 740s it's not an issue.
 
I will say I did the "cut it and then fix later" method as well when removing my own AW70 oil pan on a 240. I used one of the little miniature pipe cutters one can get off Amazon. Worked great.

I used hose and hose clamps on mine - it never leaked BUT if you do choose to use hose, be sure to make the cut as high on the dipstick tube as possible, just below the bracket which fastens it to the engine. That way the hose is always above the level of the ATF in the pan and has minimal exposure to oils. If you can get properly oil rated hose, even better.
 
Back
Top