• Hello Guest, welcome to the initial stages of our new platform!
    You can find some additional information about where we are in the process of migrating the board and setting up our new software here

    Thank you for being a part of our community!

Wheel Well / Side Trim predicament

the_hairy_baboon

Active member
Joined
Dec 1, 2021
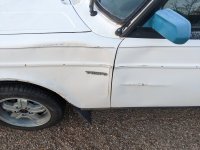
Some prior owner of my 1983 245 smeared the front left fender / door. As a result, the wheel well liner got bent, and due to the larger wheels they were running has a worn hole in it. (Also the sweet beltline trim fell off because that portion also got dented). I snagged an undamaged one at a junkyard but realized that because I haven't gotten the fender back to proper shape I can't fit the liner and get all the bolts to line up. So the question is: What is the easy way for a shadetree mechanic to get the fender back to shape - enough that a new wheel well liner will fit and the belt trim can be put on? I don't have a garage to work in, but have decent outside weather.

I tried just popping the dent out with some pieces of wood between the engine bay and fender when I had the liner off and I can get some movement but not really enough to pop out the dent - I think it may be more than elastic deformation. I haven't attempted anything on the door, but I assume taking off the card and removing window components should let me get enough access to gently hammer stuff out.

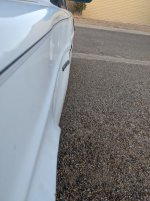
Pictures of current status below. I included a comparison shot of the right fender.
 

Attachments

  • PXL_20230205_001857255_small.jpg
    PXL_20230205_001857255_small.jpg
    341.2 KB · Views: 15
  • PXL_20230205_001905010_small.jpg
    PXL_20230205_001905010_small.jpg
    383.3 KB · Views: 15
  • PXL_20230205_001916339_small.jpg
    PXL_20230205_001916339_small.jpg
    721.9 KB · Views: 12
  • PXL_20230205_001932995_small.jpg
    PXL_20230205_001932995_small.jpg
    674 KB · Views: 15
How far back does the damage go? Looks like left front fender, left front door, and left rear door at least at the front edge?

Given how huge the dents are, I'd say you might get a prettier result with replacement panels and a cheap or "close enough" respray than trying to pull the panel without a whole body shop's worth of tools. Still not that hard to find non-smashed panels in many places.

If you just want "good enough to bolt on the liner", you could try either removing the whole fender so you can get at the backside, or trying to pull from the trim holes with a slide hammer. But you won't get the whole dent out and it'll never be quite the same shape again.
Left rear door is fine, the damage stops @ halfway down the length of the driver door.

annoyingly I was just at a junkyard where a 1993 240 (that I got the replacement liner from) I think had a perfectly good fender - but would need a full spray. I think I'll try pulling the fender off in order to be able to pop the dent, then I should be able to pull the sheet metal around enough for the well liner to fit - something feels too ship of Theseus for me with a whole fender swap. Assuming fender bolts loosen it's pretty easy to remove it right? I don't need perfect - I just want to be able to fit the trim and the wheel liner.

Slide hammer like this and basically put the allen key in the trim hole? https://www.oreillyauto.com/detail/...-slide-hammer/sg00/81500?q=slide+hammer&pos=8
 
'93 and '83 fenders don't interchange since they did the new hood and headlights design in '86. I did a bit of reading around to double check myself - looks like it's all bolt on except for a spot under the front lights, which may be welded, but is small enough you can cut it with a grinding wheel, sharp chisel, hacksaw blade, etc. If you're keeping the fender I'd at least make sure to clean up that surface rust line, and paint it plus any other exposed metal areas to keep rust from spreading.

I would not bother with the slide hammer on second thought, the trim holes are in the wrong place to pull out the center of the dent.

Lakeside Autobody on YT has a variety of videos which might help give an idea of what's needed to fix stuff that big. Really your best hope is a replacement I'm afraid.

 
Finally built up the courage to try to do fix this - generally worked decently well. Overall, removed Fender, pushed out enough of the dent for the trim to fit well. Put a new wheel well liner in, put fender back on, massaged positioning to get everything to bolt up again. Specifics for this 1983 Turbo below

1. To remove the front bolts, you take off the headlight surround trim (those push and twist guys), then move outer headlight out of the way, remove the 10mm that faces out - this lefts you slide out the corner lamp and get access to the 2x 10mm bolts.
2. There's 2 spot welds on that front corner - cutting out the putty then going in with a hacksaw gets them to separate - just don't use a carbon steel chinesium blade cause the angles make you bend the blade a lot. There appears to be a set of holes that look like they could have been for a bolt - anyone have experience using that as a way of joining once done?
3. My top rail 8 bolts were easy except for the last 2 - one is generally blocked by the hood spring, the last is blocked by hood hinge - also due to build accuracy / aforementioned damage, I had to haul on the fender when putting the bolts back in to get the clearance needed to start threading them.
4. Since I specifically cared about getting the black trim on, I didn't actually fully knock the dent out, just flattened the path the trim would go on - laid the fender on a plank of wood with a bit of newspaper for protection. Then put a folded section of newspaper under a length of wood that was about as wide as the inside of that raised path - used a hammer on that to put it back out / spread the load. To get the convex shape near the door I rolled up some newspaper to raise it slightly and hammered a bit more to get the extra push out vs just flat. While hammering, the VOLVO logo fell off - old adhesive looks groady AF. What's good for cleaning off old adhesive, applying the metal decal again?
5. As part of pulling things apart the front left hockey stick popped off, and I had to remove an old clip - I can buy more clips easily, but the rubber is coming off the hockey stick really easily - Is there a good method to glue it back on? Heat with hair dryer to get pliable, scarify surface, apply XX glue, clamp in place to let dry?
6. After my adjustments the driver door didn't want to open/close (interference) so used a dent puller to raise the fender out to make it clear properly.

Probably should get the white POR Edgewood Encapsulator spray can if it's in stock and cover all my damage.
 
for sticking trim back on you can't go wrong with 3M. the liquid adhesive for small parts that need to be flush, double sided body tape for larger ones
 
Got the old nastiness off with Goof Off. Still hoping for an answer for the following - I know i'll need to go back and spray that area to clean up the paint, so while everything is back on (including the hockey stick with Duco Cemented on rubber), but making it reconnected would also be good.

2. There's 2 spot welds on that front corner - cutting out the putty then going in with a hacksaw gets them to separate - just don't use a carbon steel chinesium blade cause the angles make you bend the blade a lot. There appears to be a set of holes that look like they could have been for a bolt - anyone have experience using that as a way of joining once done?

Continuing this thread for the door damage - in the 1st attached photo in the first post, you can see the metal has been pushed in near the hinge. I took the door card off to see if I could push this out from the inside - annoyingly that first hole is not easily accessible - there's maybe 1/4" of space between the outer sheet metal and the stuff that hides the hinges - very quickly though it goes to having gobs of space by the time I get to the 2nd hole (~8.5" away). So my thought for pushing it out enough to get the trim on well is as follows (see attachment).
  1. Get an elbow made that'll fit through the hole (it's ~ 0.22" max diameter). Have the end threaded to attach to slide hammer or tighten a nut to pull
  2. Have an interior piece that applies pressure from the inside - braces the next hole along. This is connected with a straight threaded rod to the outside.
  3. Have an outside piece as the brace that allows me to pull on both holes / judge how straight the dent has become
Between slide hammer and screw thread tension I think I can pull it out enough to get the trim on (main objective). Also, as the first hole pulls out, there will be more space to potentially get the inside brace over to the leftmost hole and apply more even force. I may be able to slide a nut over to the leftmost hole and hold it while I thread a rod from the outside and use that instead of an angled piece of metal.

Good, bad idea? Suggested improvements?
 

Attachments

  • Door Dent Pull Diagram.png
    Door Dent Pull Diagram.png
    9.7 KB · Views: 1
Went to Ace to brainstorm ideas and see what exists:
  • No good angled items <0.22"
  • For threaded items (to say attach a washer/nut to, it'd be 3/16" or M5, which then is down a chunk of diameter where the threads are.
  • Anything I could bend would not have a tight angle and would be softened by the bending.
  • There was some shelving rod that was 0.5" thick with holes that could be used as inner brace - except that's wider than the 0.43" I measured for the width of the trim groove - it also wouldn't fit in the tight area with the worst damaged hole
  • An Ace employee suggested trying to push it out from the inside - make a wooden wedge to push against inside of hinge to get metal further out - it would allow me to get the groove width correct, but I'm worried i'll just get a block of wood stuck in the door.
    • Alternatively suggested using a crowbar to pry it out, but I don't think there's anything sturdy to brace against
Anyone got better ideas?
 
Well, got 3M double sided tape and backed the badge - it's very sticky stuff so carving off excess and making drainage wasn't the easiest, but it's done. Foam might be cleaner cutting. Anyhoo, the big things to remember is avoid water traps.
Volvo Decal Backing Tape.jpg
 
Worked the door enough out of bend to attach the trim (did the encapsulator so don't have trim on yet. Angled a chunk of wood, pushed it in in two methods - one has it coming in at and angle and then I could hammer on the end (with extension stick) OR push it in to pry. The other method puts it in roughly flat to the outer panel and them I could pry it sideways. See photos for shape / usage angles.

Note that Edgewood Encapsulator in white is fairly close to Volvo's white of the 240 era, but not the same. Likely will evaluate once dry and determine if I want to get the official color spray (cause I don't know if time has affected my white's color anyways).
 

Attachments

  • PXL_20230917_150552732.jpg
    PXL_20230917_150552732.jpg
    73 KB · Views: 2
  • PXL_20230917_150609018.jpg
    PXL_20230917_150609018.jpg
    65.4 KB · Views: 2
  • PXL_20230917_150624698.jpg
    PXL_20230917_150624698.jpg
    52.9 KB · Views: 2
  • PXL_20230917_150647671.jpg
    PXL_20230917_150647671.jpg
    76.8 KB · Views: 2
Spray dried enough, took off the masking, put on the trim I had gotten from a junkyard - broke only one of the age old #1372059 clips, so will need to get a replacement for it - perhaps get a full set of replacements for them (some went in kind of easy so should stay but not confidently.
 
Note to future self / others - #1372059 do not necessarily stay in well, especially if you get the cheap variant (https://www.ipdusa.com/products/21584/240-Exterior-Molding-Trim-Clip-1985-IPD-140099-Volvo-1372059) I folded some tape up and put behind them so they'd hold properly while installing.

Getting the old version out (the put into panel then smack the trim onto it style) involved using a knife tip on a soldering iron to cut through the plastic. Could not find a way to pry the old ones out (half of them were breaking their heads off from age, but clearly not aging their backsides).
 
Was having trouble getting the rocker trim (#1255891) to clip back onto the clips - thought potentially from the side damage that the fender strut (#1254041) was bent in some, and the extra bend angle was forcing it off the clip. Turns out, no damage, but now I have a spare one, including the two bolts used to hold the strut to the frame (#946485), the two bolts/washers to hold the mudflaps and liner to the strut (#946215 + #960140, or at least the short late model version for plastic flaps), and the one bolt to hold the strut to the fender (#946485 again I believe).

Had moderate success with taking some pliers, giving it a little gentle squeeze to reduce the spacing between the metal ridges. Next time the fender comes off I may pre-bend it in some to help encourage it to stay.
 
Back
Top